Coloring a Work Order
After you've checked over your work order and verified that all the information is correct, you're ready to color your order.
Depending on which edition you've chosen, the button on the main screen will look different. You may see a button that reads 'Color Coordination,' or you may see one that reads 'Embroidery.' Either way, both of these buttons will take you to the same screen. For this document, I will use the 'Color Coordination' button as an example.
- Click on the 'Color Coordination' button on the main screen.

- The GET screen will open. Select the criteria you want and click OK, or simply click OK without filtering criteria to return the first 500 work orders. For this example, let's specify order 530883 - the order
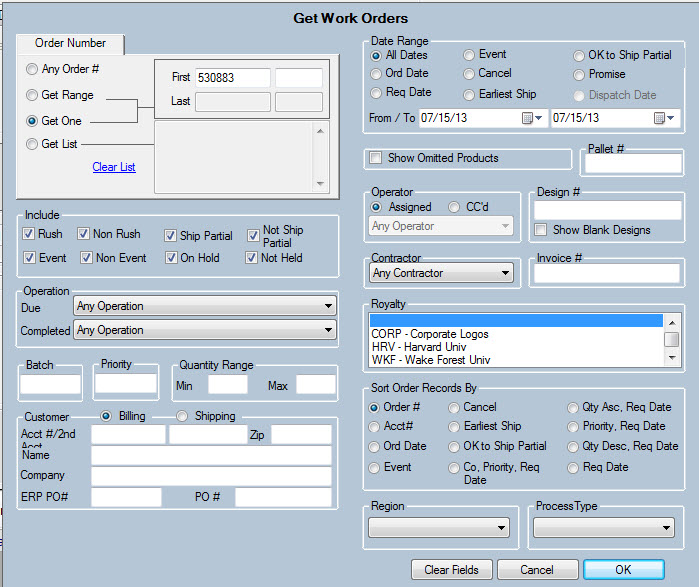
- This particular order has 3 work orders, with each work order split into 3 separate screens.

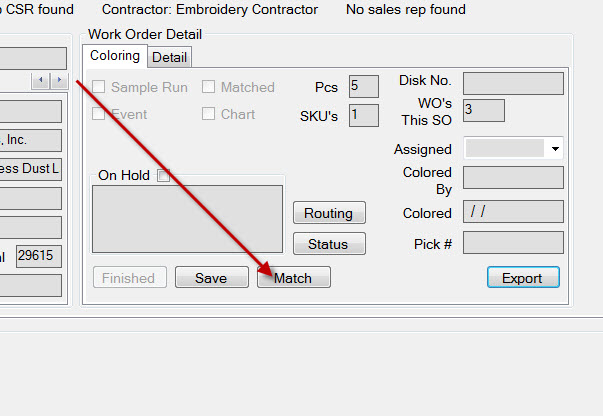
- The first thing you'll do once the work order(s) opens is match the order.
- Click on the 'Match' button int he Work Order Detail/Coloring tab.
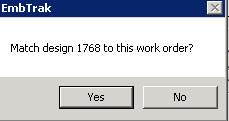
- A dialog box will pop up and ask you if you want to match that design to the work order. Click 'Yes.'
- One of two things will happen: The design will either match to the work order, or no match will be found. If EmbTrak finds a match, then the color card and thread data will populate automatically. You always have the option to overwrite that data by typing in new thread colors. If EmbTrak does not find a match, then the color card area will display that no color card is found. You have the option to create a new color card at that time by clicking on the 'New' button in the color card section, but creating a color card is not required.

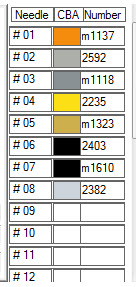
- Your new color card will display the amount of stops for that design and will now look like this:

- You can either fill out the thread numbers in the color card itself, or fill them out in the Editor and then copy them down to the color card, if you choose to make a color card. If not, leave the color card with the default text.
- Click on the 'Match' button int he Work Order Detail/Coloring tab.
- the Editor tab is located near the top of the screen next to the Work Order Information tab. (NOTE: The Editor tab will not be available until you click the Match button.)
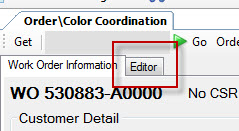
- Click on the Editor tab, and the 'Color Selection' tab will open by default. This is where you'll actually color the design.
- The Editor will, by default, open to the Color Selection tab. You'll see a grid of thread colors, numbered boxes, various buttons and the design itself.
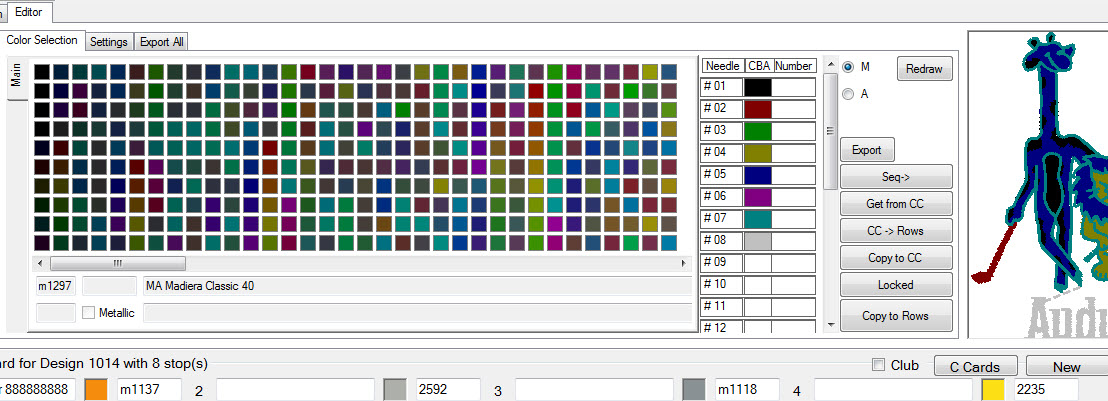
- Now let's break the Editor down by section:
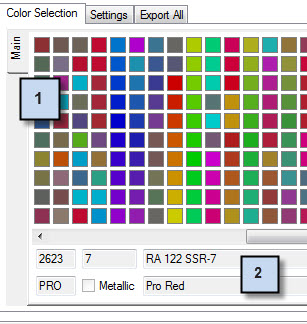
- The grid of thread color boxes is one way you can select thread colors for the design (section #1 in screenshot below). By mousing over each colored square, you'll be able to see the data about that specific color: thread number, thread palette, thread name (section #2 in screenshot below). NOTE: Thread name may not be available on certain palettes.
- The grid in the middle of the Editor is where you actually choose the thread numbers. You can type the thread numbers in themselves or you can click on the color you want in the thread color palette grid (pictured above) to fill in the numbers.
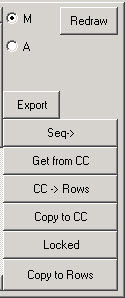
- You'll see a row of buttons in between the design viewer and the grid where you enter thread numbers.
- 'M' and 'A' radio buttons: These stand for 'Maximum' and 'Actual' and dictate how the design will show up in the viewer. Select Maximum, and the entire design will scale to fit within the viewer, so the entire design is visible. Select Actual, and teh design will appear in actual size, whether or not it fits in the viewer.
- Redraw: The design typically redraws automatically automatically, unless you select the option to not automatically redraw. If that is the case, then you'll need to cick the Redraw button to update the design in the viewer.
- Export: Covered in the Export section.
- Seq->: After you've filled in the thread numbers, you can click the Seq-> (Sequence) button, and any row in the product detail grid below that doesn't already have thread numbers filled out will populate with the thread numbers chosen in the Editor.
- Get from CC: This stands for Get from Color Card. If you've filled out thread numbers in the color card section below, you can click the Get from CC button and those colors will be copied from the color card up to the thread number section in the Editor.
- CC -> Rows: This stands for Color Card to Rows. Similar to the 'Get from C' button above, if you've filled out thread numbers in the color card section, you can click the CC -> Rows and those colors will be copied down to the product detail grid below.
- Locked: Once you have the thread numbers chosen, click the Locked button so the thread colors won't change as you click throughout the work order. Since the thread numbers in the Editor reflect whatever product line you're on, if you don't lock your thread numbers in, and then click to a different line before copying the threads to the product grid, then you'll lose your thread selection.
- Copy to Rows: When you click the Copy to Rows button, this will take the thread numbers you've already chosen in the Editor and copy them down to the selected rows in the product grid section below.
- The last section of the Editor is the viewer. You can see the design in the viewer, and as you choose the thread numbers, the design will change to reflect those thread colors (unless, like mentioned above, you have that option turned off and will need to click the Redraw button before changes are visible). The screenshot below shows the design displayed in actual thread colors.

- When thread numbers are not yet specified, the design appears in 'system colors.' System colors are colors that EmbTrak displays so the users can differentiate between the various stops, but do not represent the actual color of the design itself.

- The grid of thread color boxes is one way you can select thread colors for the design (section #1 in screenshot below). By mousing over each colored square, you'll be able to see the data about that specific color: thread number, thread palette, thread name (section #2 in screenshot below). NOTE: Thread name may not be available on certain palettes.
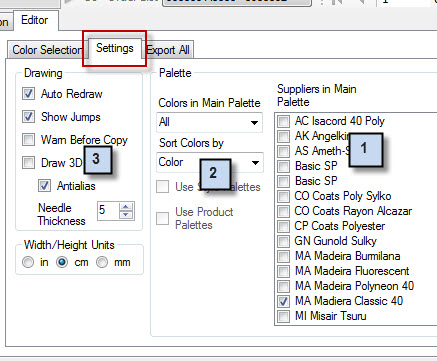
- The 'Settings' tab in the Editor is where you'll identify available thread palettes and set various other settings -- anything from how you want to organize your thread colors in the grid to whether or not you want the design to show in 3D in the viewer.
- The Editor will, by default, open to the Color Selection tab. You'll see a grid of thread colors, numbered boxes, various buttons and the design itself.
- After you've chosen the thread colors in the Editor, copy the thread numbers to the product detail grid below by either clicking the 'Copy to Rows' button or 'CC -> Rows' button (whichever is applicable) explained above. This will fill in the corresponding columns in the product detail grid on whatever line(s) you have highlighted.

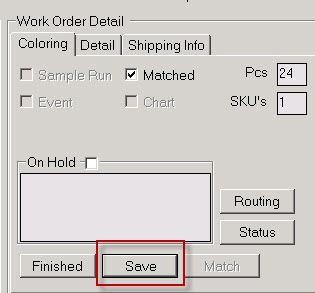
- Click the 'Save' button to save your work.
- Then click the 'Finished' button. The button will gray out and display a green line underneath. By clicking the 'Finished' button, you're both saving your work and advancing that work order to the next step in the routing
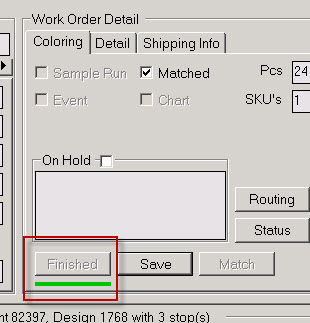
(Note: If you plan to return to the order at a later time to change thread numbers or alter the order at all, only click 'Save,' but not 'Finished.')